
For this project, I wanted to migrate an existing WordPress website from Hostinger to my own infrastructure.
The website was already fully built with WordPress and Elementor and contained an existing MySQL database and a large media library. Instead of rebuilding the website, the goal was to move the complete installation while keeping all pages, plugins, Elementor designs and media intact. The new environment is based on Debian, Docker and Pangolin.
The New Setup
The WordPress website runs on a dedicated Debian virtual machine.
Instead of installing the complete web stack directly on Debian, WordPress and MySQL run as separate Docker containers.
The basic architecture looks like this:
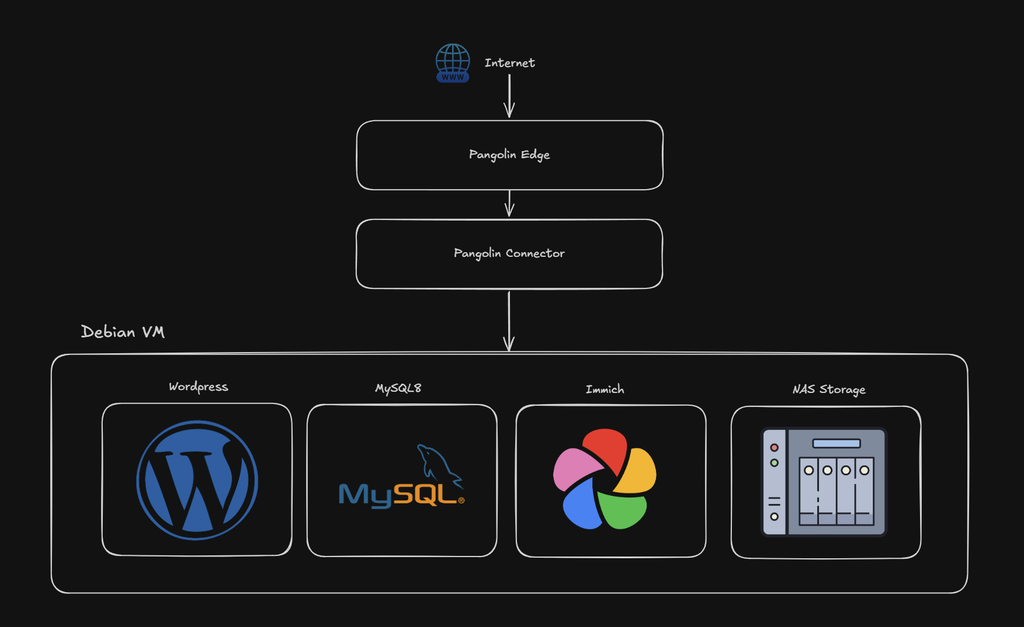
Pangolin handles external access to the services, which means the WordPress server itself does not need to be directly exposed to the Internet.
Preparing the Debian Server
The first step was creating a dedicated Debian VM and installing Docker and Docker Compose.
For the WordPress environment, I created the following directory structure:
sudo mkdir -p /opt/wordpress/html
sudo mkdir -p /opt/wordpress/import
cd /opt/wordpress
The html directory contains the actual WordPress installation, while import can be used temporarily during the migration.
The database uses its own persistent Docker volume.
Creating the WordPress Docker Stack
The stack consists of two main containers:
WordPress
wordpress:php8.2-apache

Database
mysql:8.0
WordPress is exposed internally on port 8080.
The database is only accessible through the internal Docker network and does not need to be published on the host.
The important part of the setup is persistent storage. The WordPress files are stored under:
/opt/wordpress/htmlwhile the MySQL database is stored in a persistent Docker volume.
This allows the containers themselves to be recreated or updated without losing the website.
Exporting the Website from Hostinger
The existing Hostinger installation consists of two important parts:
public_html
MySQL database
The complete public_html directory needs to be downloaded from Hostinger.
This includes:
wp-admin
wp-content
wp-includes
wp-config.php
plugins
themes
uploads
For downloading the WordPress files, I recommend using FTP with FileZilla. Especially for larger WordPress installations, FileZilla makes it easy to transfer the complete public_html directory while keeping the original folder structure intact.
Create an FTP account in Hostinger or use the existing FTP credentials, connect to the server with FileZilla, and download the complete public_html directory to your local machine.
The MySQL database also needs to be exported separately as an SQL file. This can be done through the Hostinger control panel using phpMyAdmin or the available database export function.
In my case, the WordPress files were around 38 GB, mainly because of the existing media library.
Transferring the WordPress Files
The exported public_html directory can be copied directly to the persistent storage of the new server.
I used:
/opt/wordpress/import/public_htmlas the temporary migration location.
After the transfer was complete, I copied the existing WordPress installation into the directory used by the Docker container:
cp -a /opt/wordpress/import/public_html/. /opt/wordpress/html/The -a option preserves the directory structure and file attributes while copying the complete installation.
Afterwards, the size can be verified with:
du -sh /opt/wordpress/htmlImporting the MySQL Database
The SQL export is copied to the WordPress server as well:
/opt/wordpress/backup.sqlBefore importing it, the database references from the old hosting environment should be adjusted to match the new Docker database.
In my setup, the new database is called:
wordpressThe SQL dump can then be imported directly into the MySQL container:
docker exec -i wordpress-db \
mysql -u wordpress -p"PASSWORD" wordpress \
< backup.sql
After the import, the database can be verified with:
docker exec wordpress-db \
mysql -u wordpress -p"PASSWORD" \
-e "USE wordpress; SHOW TABLES;"
The existing WordPress tables should now be visible, including tables such as:
wp_posts
wp_postmeta
wp_options
wp_users
wp_usermeta
wp_terms
as well as the tables created by Elementor and other installed plugins.
Updating wp-config.php
The existing wp-config.php can continue to be used, but the database connection needs to match the new Docker environment.
The important settings are:
define('DB_NAME', 'wordpress');
define('DB_USER', 'wordpress');
define('DB_PASSWORD', 'YOUR_PASSWORD');
define('DB_HOST', 'wordpress-db');
Because both containers are connected through Docker networking, WordPress can use the MySQL container name as the database host.
Starting WordPress
Once the files and database are in place, the containers can be started:
docker compose up -dThe status can be checked with:
docker psWordPress is internally available through:
http://SERVER-IP:8080A simple test can also be performed directly from the server:
curl -I http://127.0.0.1:8080At this point, the original WordPress installation is already running on the new self-hosted server.
Publishing WordPress Through Pangolin
For external access, I use Pangolin.
Instead of forwarding ports directly from the Internet to the WordPress VM, Pangolin provides access to the internal service. I created resources for:
der-stammtisch.com
www.der-stammtisch.com
Both resources point to the WordPress service running on port 8080.
The public DNS records for the website point to the Pangolin edge server.
Existing mail records such as MX, SPF, DKIM and mail-related CNAME records can remain unchanged because they are independent from the WordPress hosting.
Enabling HTTPS
HTTPS is handled by Traefik on the Pangolin edge server.
Let’s Encrypt is configured as the certificate resolver, allowing Traefik to automatically request and renew certificates for the published domains.
After publishing the resources, the certificates can be verified with:
openssl s_client \
-connect der-stammtisch.com:443 \
-servername der-stammtisch.com </dev/null 2>/dev/null \
| openssl x509 -noout -subject -issuer -dates
The same check can be performed for the www domain:
openssl s_client \
-connect www.der-stammtisch.com:443 \
-servername www.der-stammtisch.com </dev/null 2>/dev/null \
| openssl x509 -noout -subject -issuer -dates
Both domains are now protected with automatically managed Let’s Encrypt certificates.
Using WWW as the Primary Domain
For the final setup, I decided to use:
https://www.der-stammtisch.comas the canonical website address.
The root domain:
https://der-stammtisch.comredirects visitors to the www version.
This keeps the website consistent and prevents WordPress and Elementor from generating resources with different hostnames.
Updating Elementor URLs
Because the website was migrated and the primary URL was changed to the www version, Elementor’s stored URLs also need to be updated.
Elementor provides a built-in tool for exactly this purpose.
In WordPress, navigate to:
Elementor
→ Tools
→ Replace URL
The old URL is:
https://der-stammtisch.com/and the new URL is:
https://www.der-stammtisch.com/Running the replacement updates Elementor’s stored references to the new canonical address.
This is especially important for generated CSS files, locally stored Google Fonts, images and other Elementor resources.
For example, the website uses fonts such as Bagel Fat One, which Elementor stores locally inside the WordPress uploads directory.
After replacing the URL, the public website and Elementor editor use the same resources and styling.
Cleaning Up the Migration Files
Once the website has been tested successfully, the temporary migration files are no longer required.
The imported copy can be removed:
rm -rf /opt/wordpress/import/public_htmlThe SQL migration files can also be deleted:
rm -f /opt/wordpress/backup.sql
rm -f /opt/wordpress/backup-original.sql
The production WordPress files remain safely stored under:
/opt/wordpress/htmlAdding Immich for Photos and Videos
With the website now running on my own infrastructure, I also added Immich to the server.
Instead of storing large collections of photos and videos directly inside the WordPress media library, Immich provides a dedicated platform for managing them. Immich runs as another Docker stack and is published through Pangolin using its own subdomain.
The actual media storage is located on my NAS. This gives the environment a clear separation:
WordPress
Website and articles

Immich
Photos and videos

NAS
Media storage

Pangolin
Secure external access
The NAS share is mounted on the Debian host and then made available to the Immich containers.
This also means the large media collection does not have to live on the VM’s local system disk.
Final Architecture
After the migration, the complete environment looks roughly like this:
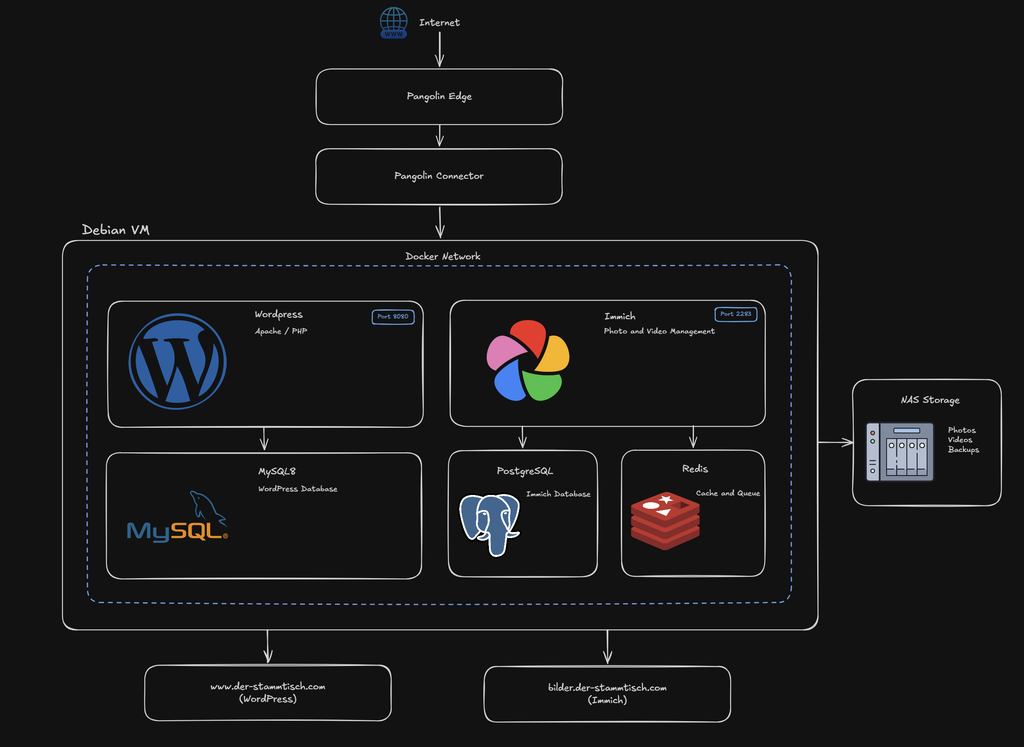
WordPress and Immich remain internal services, while Pangolin handles external access and TLS termination.
Conclusion
The existing WordPress and Elementor website is now completely self-hosted.
The migration preserved the original website, including its database, Elementor pages, plugins, themes and media files. There was no need to rebuild the site from scratch.
Moving WordPress into Docker also gives me much more control over the environment. WordPress, MySQL and Immich are separated into individual services, persistent data is stored independently from the containers, and external access is handled centrally through Pangolin.
The final result combines a traditional WordPress website with a modern self-hosted infrastructure while keeping the individual components simple and maintainable.
Leave a Reply