
Overview
This guide is mainly based on the Ultimate Beginner’s Guide to GPU Passthrough on Reddit. Thanks to the original author for the invaluable resource! In no way, shape, or form does this guide claim to work for all instances of Proxmox/GPU configurations. Use at your own risk. I am not responsible if you blow up your server, your home, or yourself.
Legend
- Let’s Get Started (Pre-configuration Checklist)
- My Hardware Configuration
- Optional HDMI Dummy Plug
- Strange Behavior with the MS-01
- Configuring Proxmox
- Configuring the VM (Windows 11)
Let’s Get Started (Pre-configuration Checklist)
It’s important to make note of all your hardware/software setup before we begin the GPU passthrough. For reference, I will list what I am using for hardware and software. This guide may or may not work the same on any given hardware/software configuration, and it is intended to help give you an overall understanding and basic setup of GPU passthrough for Proxmox only.
Your hardware should, at the very least, support: VT-d, interrupt mapping, and UEFI BIOS.
My Hardware Configuration
The main system is a Minisforum MS-01 with the following configuration:
Optional HDMI Dummy Plug
For a headless system like a VM, I recommend purchasing an HDMI dummy plug to emulate a connected display for the GPU. Many remote access software solutions, such as Parsec and Steam Link, work better or only function when a monitor is detected for screen capture.
- 1080p HDMI Dummy Plug: FUERAN Headless Ghost Display
- 4K HDMI Dummy Plug: FUERAN Headless Ghost Display 4K
Both listed plugs work seamlessly without requiring additional drivers.
Note: None of the above links are affiliate links.
Strange Behavior with the MS-01
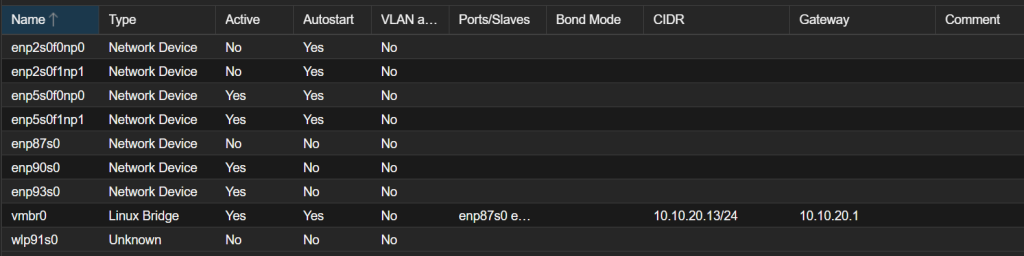
I’ve noticed some strange behavior with my MS-01 when inserting GPUs. If you’re working with the same model, make sure to enable both 1Gb ports before inserting the GPU. On my machine, this causes one of the adapters to change its name, and a new one is created.
If you’re connected to only one adapter, it’s possible that the Ethernet adapter may no longer be recognized, causing the machine to lose its internet connection. By enabling both ports, you can switch between them to find one that works. Typically, one of them will always function. In the GUI, you can activate the newly detected network port.
A similar issue occurs with the 10Gb ports, but in this case, both ports are renamed. If you’re using or have configured these ports, make sure to update your configuration accordingly. If anyone has insight into the cause of this behavior, feel free to reach out.
Configuration without GPU:

Configuration with GPU:
My Software Configuration:
Notes:
- If you need the iGPU to work, it is not recommended to build in the GPU before reaching Step 5 on an MS-01. If so the iGPU is beeing deactivated and only the display output through the GPU will work.
- Any Windows 11 installation ISO should work, however, try to stick to the latest available ISO from Microsoft.
Configuring Proxmox
This guide assumes you already have at the very least, installed Proxmox on your server and are able to login to the WebGUI and have access to the server node’s Shell terminal. If you need some guides, i can recommend to watch the following videos:
Step 1: Configuring the GRUB Bootloader
1. Open the GRUB configuration file using a text editor:
nano /etc/default/grub2. Locate the following line:
GRUB_CMDLINE_LINUX_DEFAULT="quiet"3. Replace it with:
GRUB_CMDLINE_LINUX_DEFAULT="quiet intel_iommu=on"In some cases you will also need following additional commands:
GRUB_CMDLINE_LINUX_DEFAULT="quiet intel_iommu=on iommu=pt pcie_acs_override=downstream,multifunction nofb nomodeset video=vesafb:off,efifb:off"4. Save the file by pressing CTRL + X, then confirm with Y to write the changes.
5. Update the GRUB configuration
update-grubStep 2: VFIO Modules
1. Open the modules file:
sudo nano /etc/modules2. Add the following lines to the file:
vfio
vfio_iommu_type1
vfio_pci
vfio_virqfd
Step 3: IOMMU Interrupt Remapping
1. Create the configuration file for unsafe interrupts:
echo "options vfio_iommu_type1 allow_unsafe_interrupts=1" > /etc/modprobe.d/iommu_unsafe_interrupts.conf2. Create the configuration file to ignore MSRs:
echo "options kvm ignore_msrs=1" > /etc/modprobe.d/kvm.confStep 4: Blacklisting Drivers
1. Blacklist the following drivers by appending to the blacklist file:
echo "blacklist radeon" >> /etc/modprobe.d/blacklist.conf
echo "blacklist nouveau" >> /etc/modprobe.d/blacklist.conf
echo "blacklist nvidia" >> /etc/modprobe.d/blacklist.conf
echo "blacklist amdgpu" >> /etc/modprobe.d/blacklist.conf
Step 5: Adding GPU to VFIO
1. Shut Down the Machine:
Power off the machine completely. You can use the following command to shut it down.
shutdown now2. Open the Machine:
Once the machine is powered off, physically open the case.
3. Install the GPU
4. Start the Machine Again:
Once the GPU is installed and connected, power the machine back on.
5. Verify the GPU is Active:
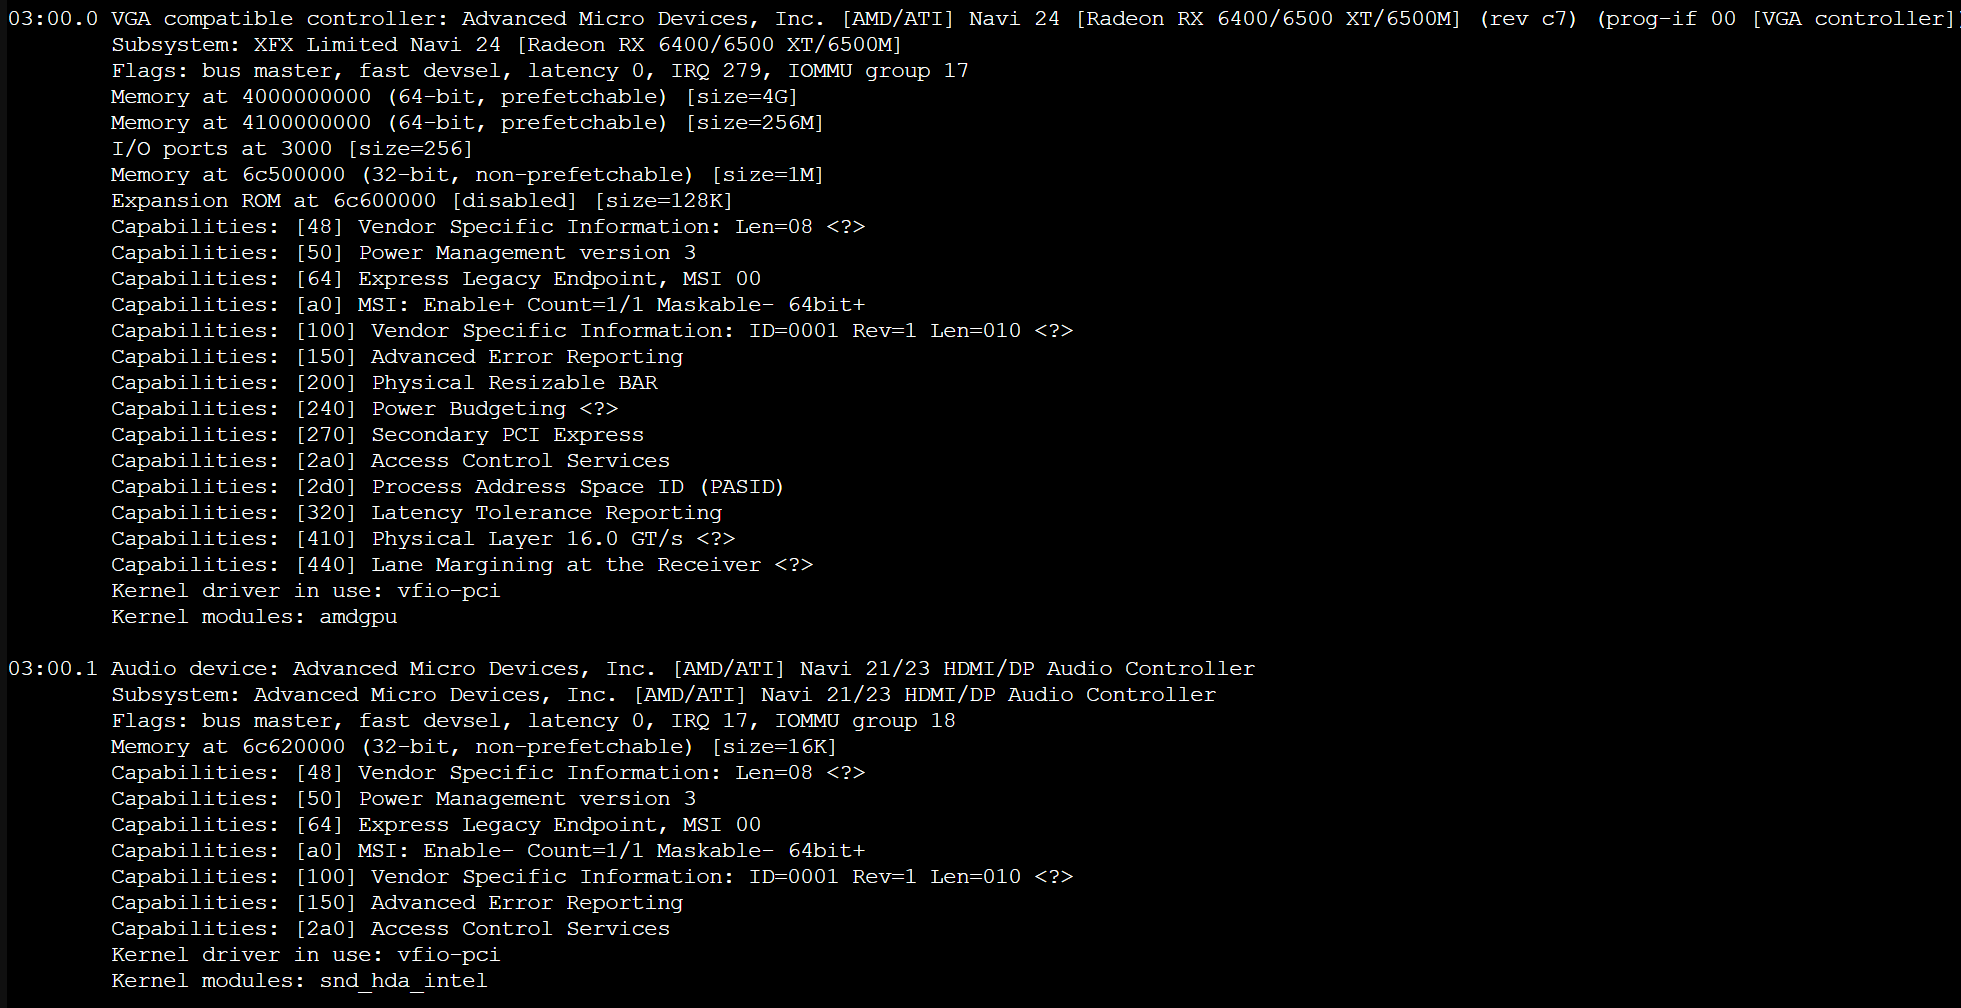
After the system boots back up, check if the built-in GPU is recognized by running:
lspci | grep VGAThis should display the integrated GPU as well as any other attached GPUs.

6. Check the list of PCI devices:
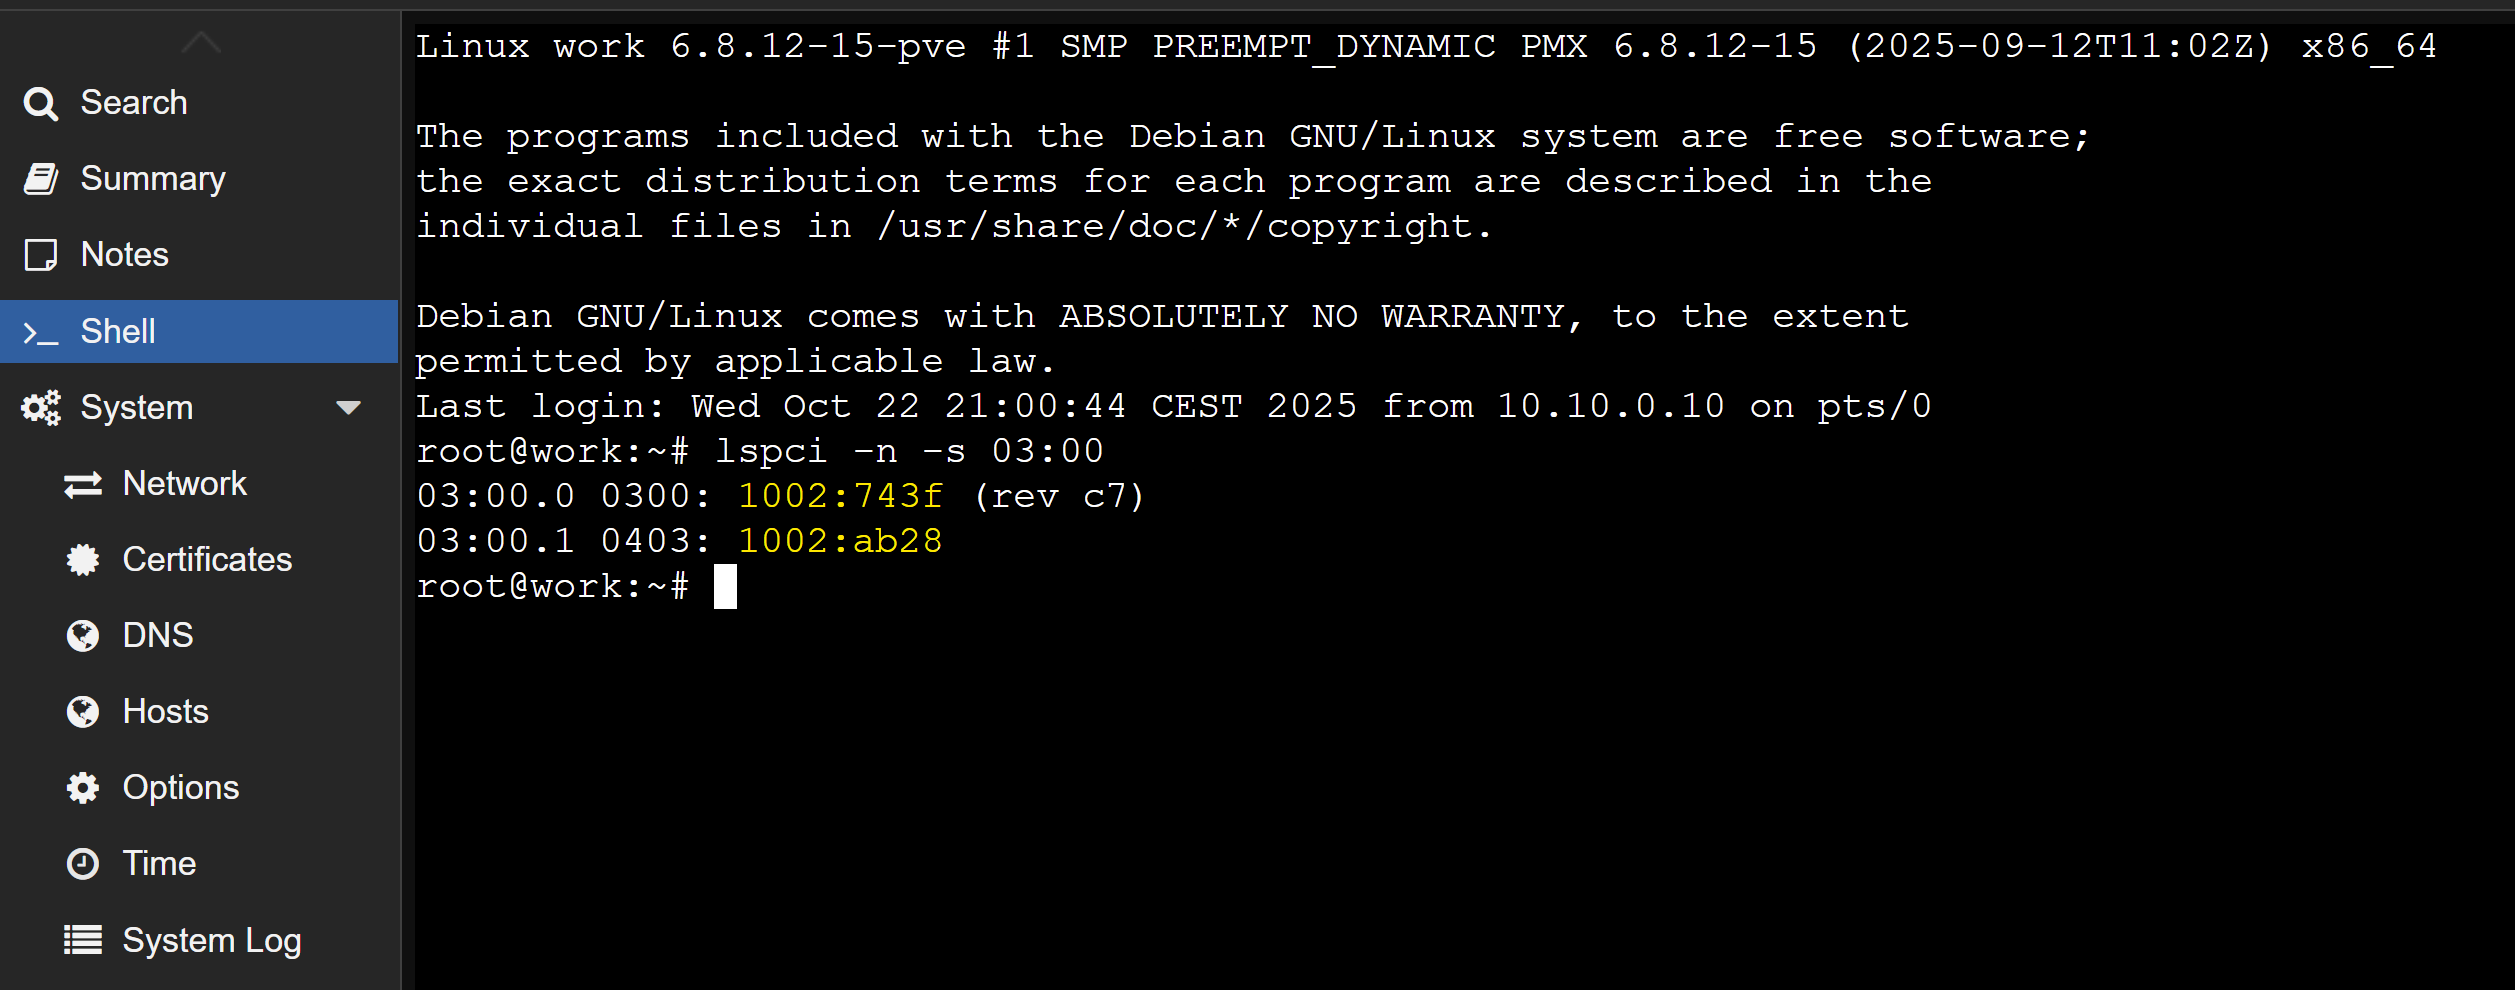
lspci -v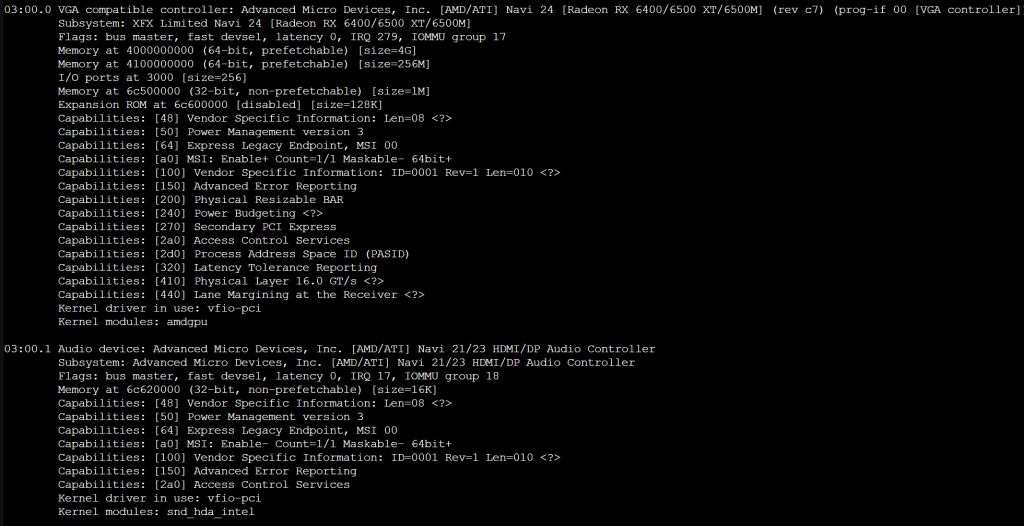
7. Get detailed information for the specific device (replace 03:00 with the correct PCI address):
lspci -n -s 03:00
8. Add the GPU to VFIO by creating a configuration file:
echo "options vfio-pci ids=1002:743f,1002:ab28 disable_vga=1" >> /etc/modprobe.d/vfio.conf9. Update the initial RAM filesystem:
update-initramfs -u10. Reset the system:
resetConfiguring the VM (Windows 11)
Now comes the ‘fun’ part. It took me many, many different configuration attempts to get things just right. Hopefully my pain will be your gain, and help you get things done right, the first time around.
1. Create a VM
Creating a Virtual Machine is pretty easy and self-explanatory, but if you’re having issues, I suggest looking up the official Proxmox Wiki and How-To guides. For this guide, you’ll need a Windows ISO for your Virtual Machine and the VirtIO Drivers.
- Windows 11 Image: Download Windows 11
- VirtIO Drivers: Download Windows VirtIO Drivers
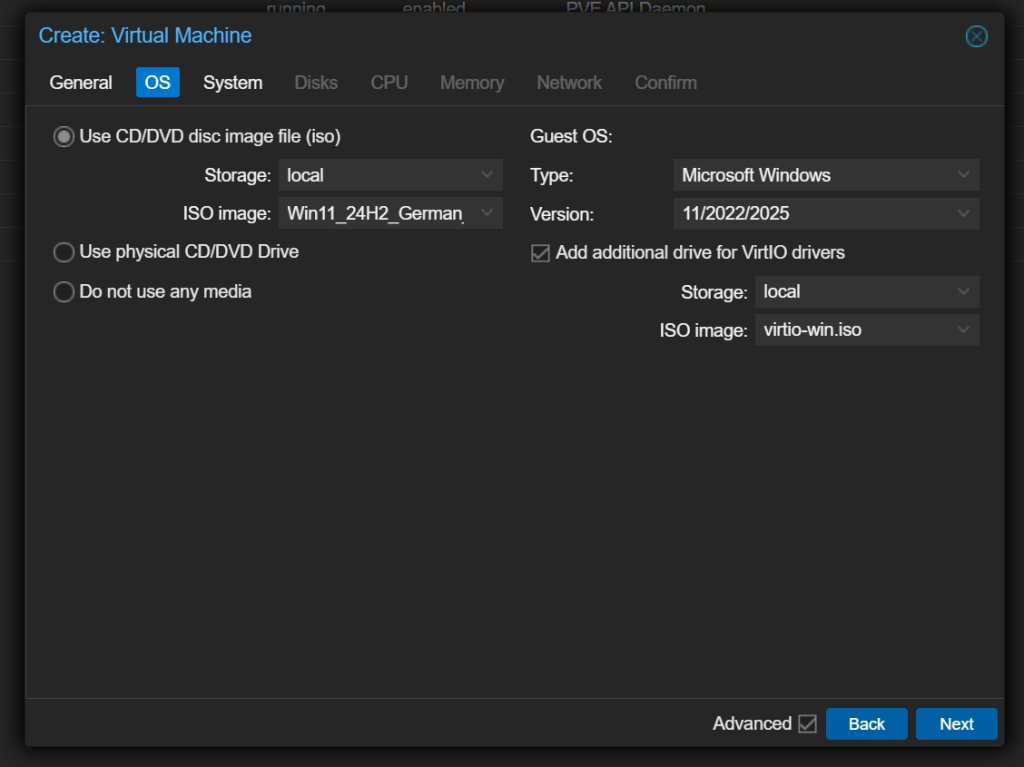
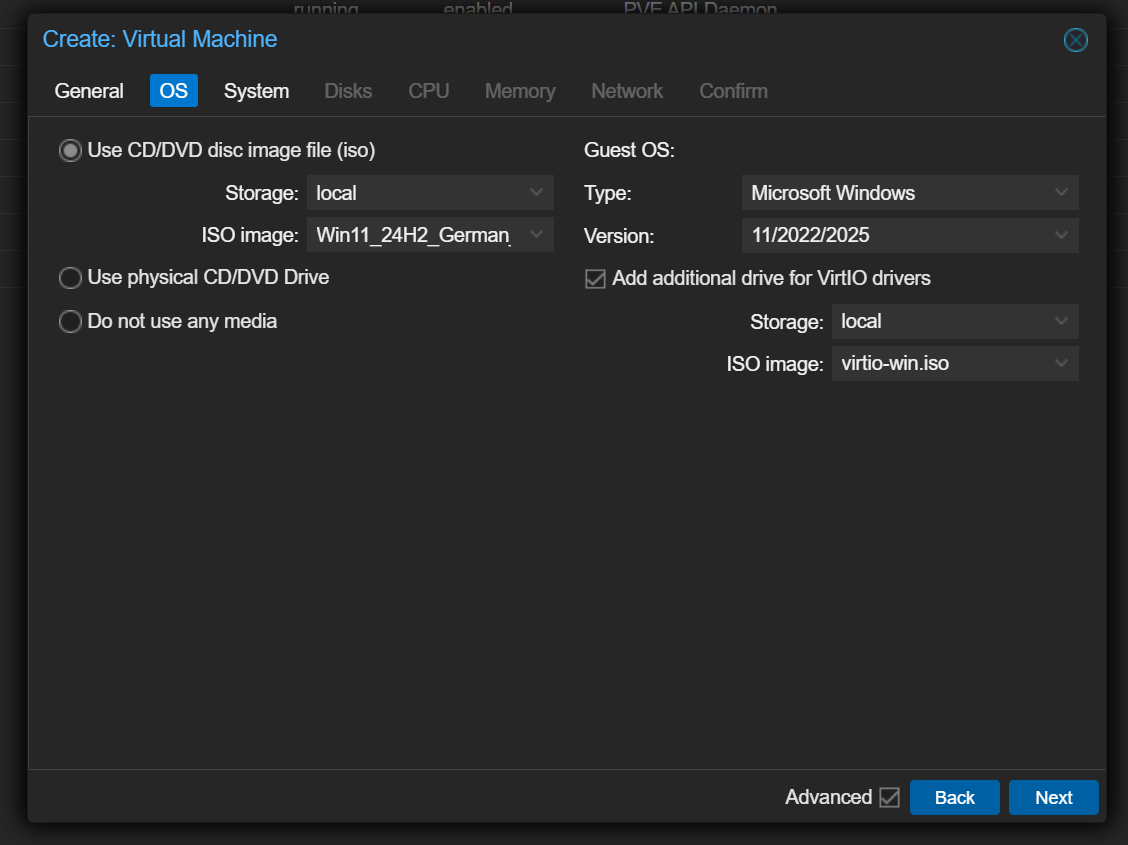
2. Enable OMVF (UEFI) for the VM
Under your VM’s OS Tab, configure the following settings:
- Storage: local
- ISO Image: Win11_24H2_German (or your downloaded ISO file)
- Type: Microsoft Windows
Add an additional drive for VirtIO drivers:
- Storage: local
- ISO Image: virtio-win.iso
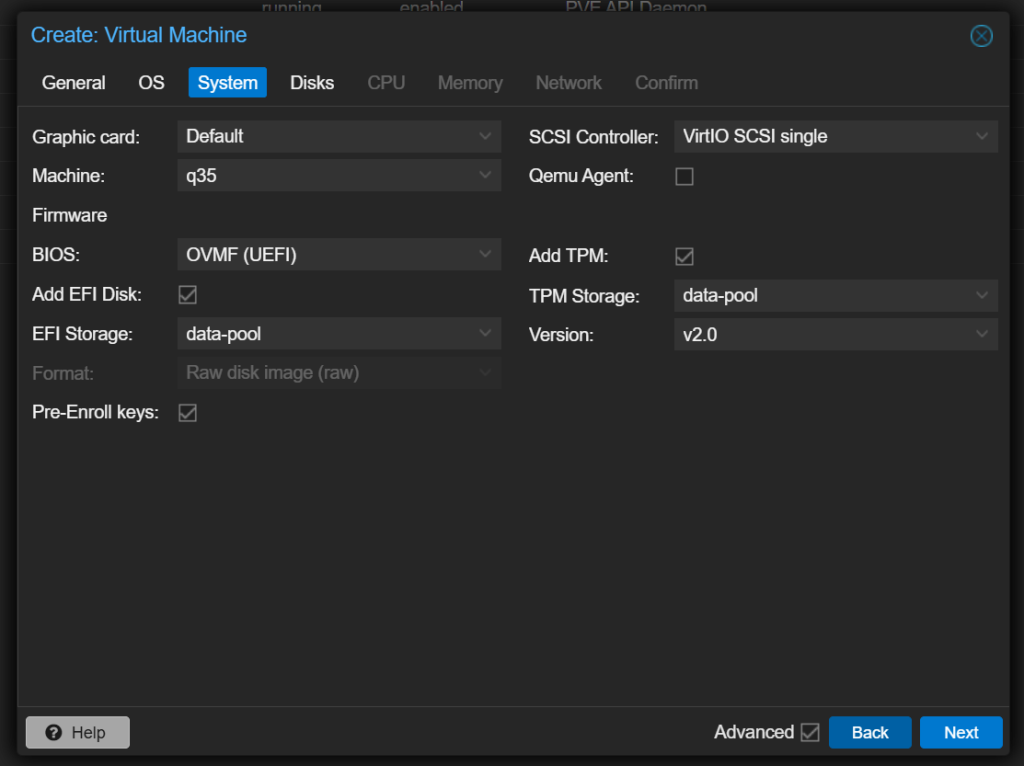
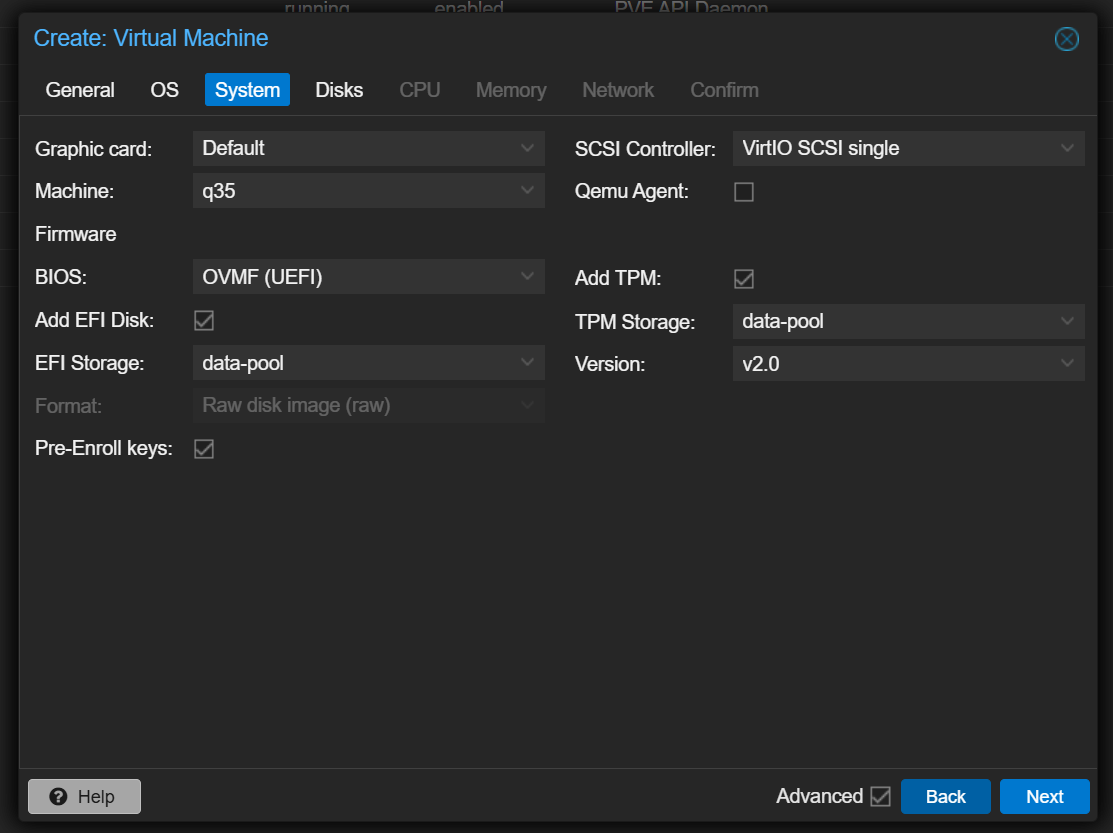
Next, go to the System Tab and configure the following:
- Graphic Card: Default (After the last GPU configuration, this can be set to
none) - Machine: q35
- SCSI Controller: VirtIO SCSI Single
- BIOS: OVMF (UEFI)
Everything else can be set according to your preference. After that, you can start the VM and proceed with the Windows 11 installation. If you want to bypass the Microsoft login, use the SHIFT + F10 combo to open the command prompt and enter the following command:
OOBE\BYPASSNROBut pssst, don’t tell Microsoft. Important: Ensure that the network card of the VM is deactivated before performing this step. After completing this, you can continue with the rest of the guide.
3. Edit the VM Config File
Going back to the Shell window, we need to edit /etc/pve/qemu-server/<vmid>.conf, where <vmid> is the VM ID Number you used during the VM creation (General Tab).
nano /etc/pve/qemu-server/<vmid>.confIn the editor, add these command lines (it doesn’t matter where you add them, as Proxmox will reorganize them after you save):
machine: q35
cpu: host,hidden=1,flags=+pcid
args: -cpu 'host,+kvm_pv_unhalt,+kvm_pv_eoi,hv_vendor_id=NV43FIX,kvm=off'
4. Add PCI Devices (Your GPU) to VM

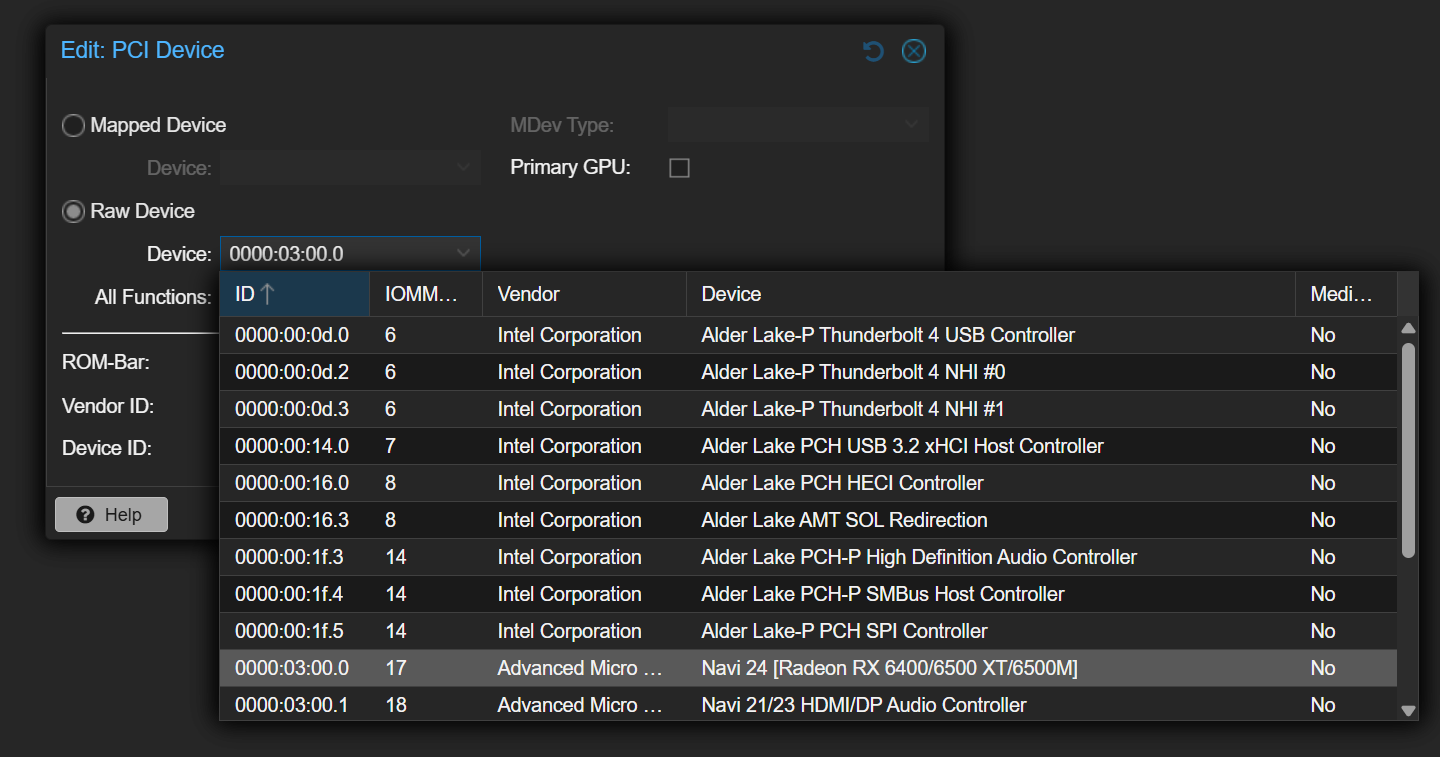
Under the VM’s Hardware Tab/Window, click on the Add button towards the top. Then, in the drop-down menu, click PCI Device.
Look for your GPU in the list, and select it. On the PCI options screen, you should configure it as follows:
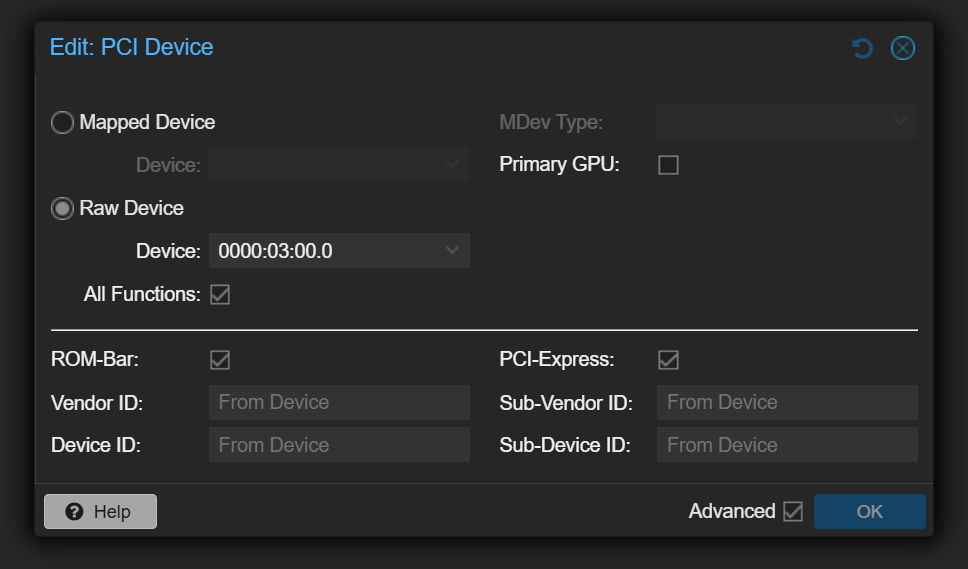
- All Functions: YES
- Rom-Bar: YES
- Primary GPU: NO
- PCI-Express: YES (requires
machine: q35in the VM config file)
5. Reboot the VM
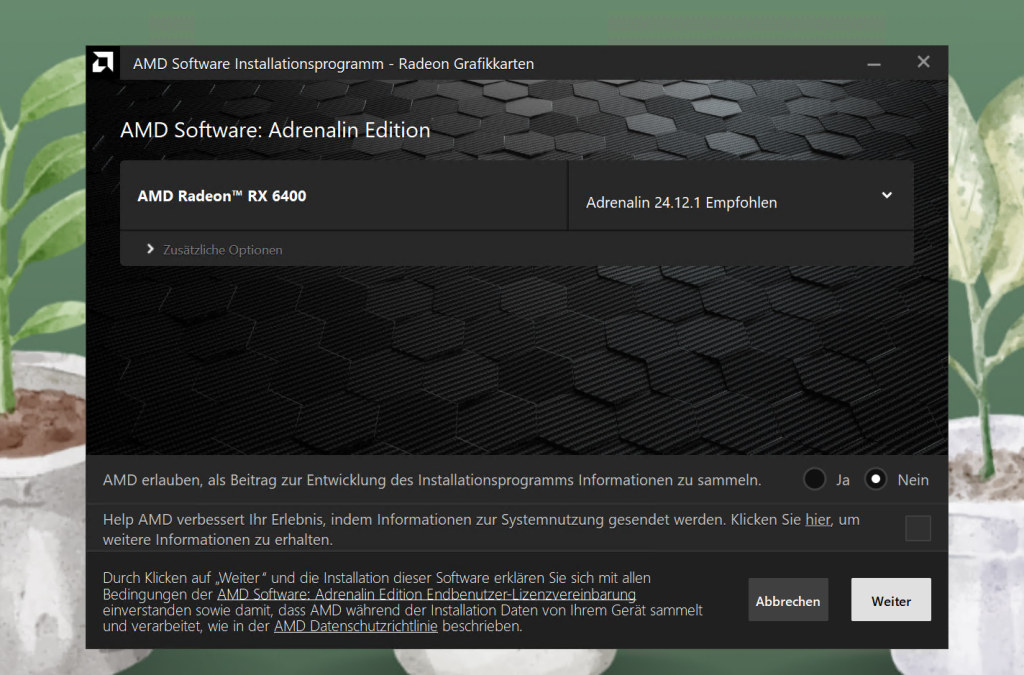
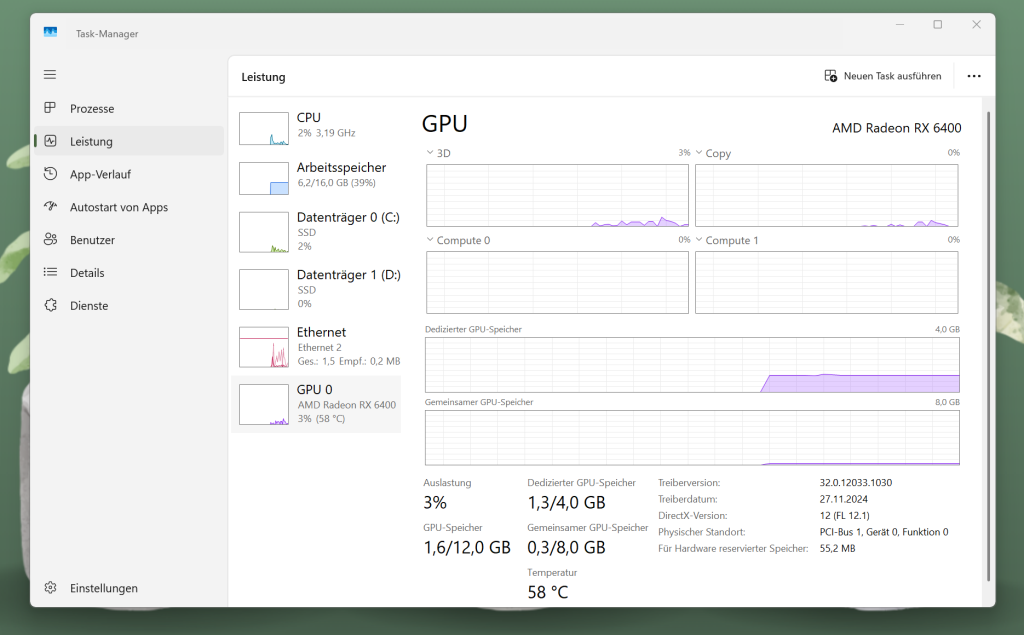
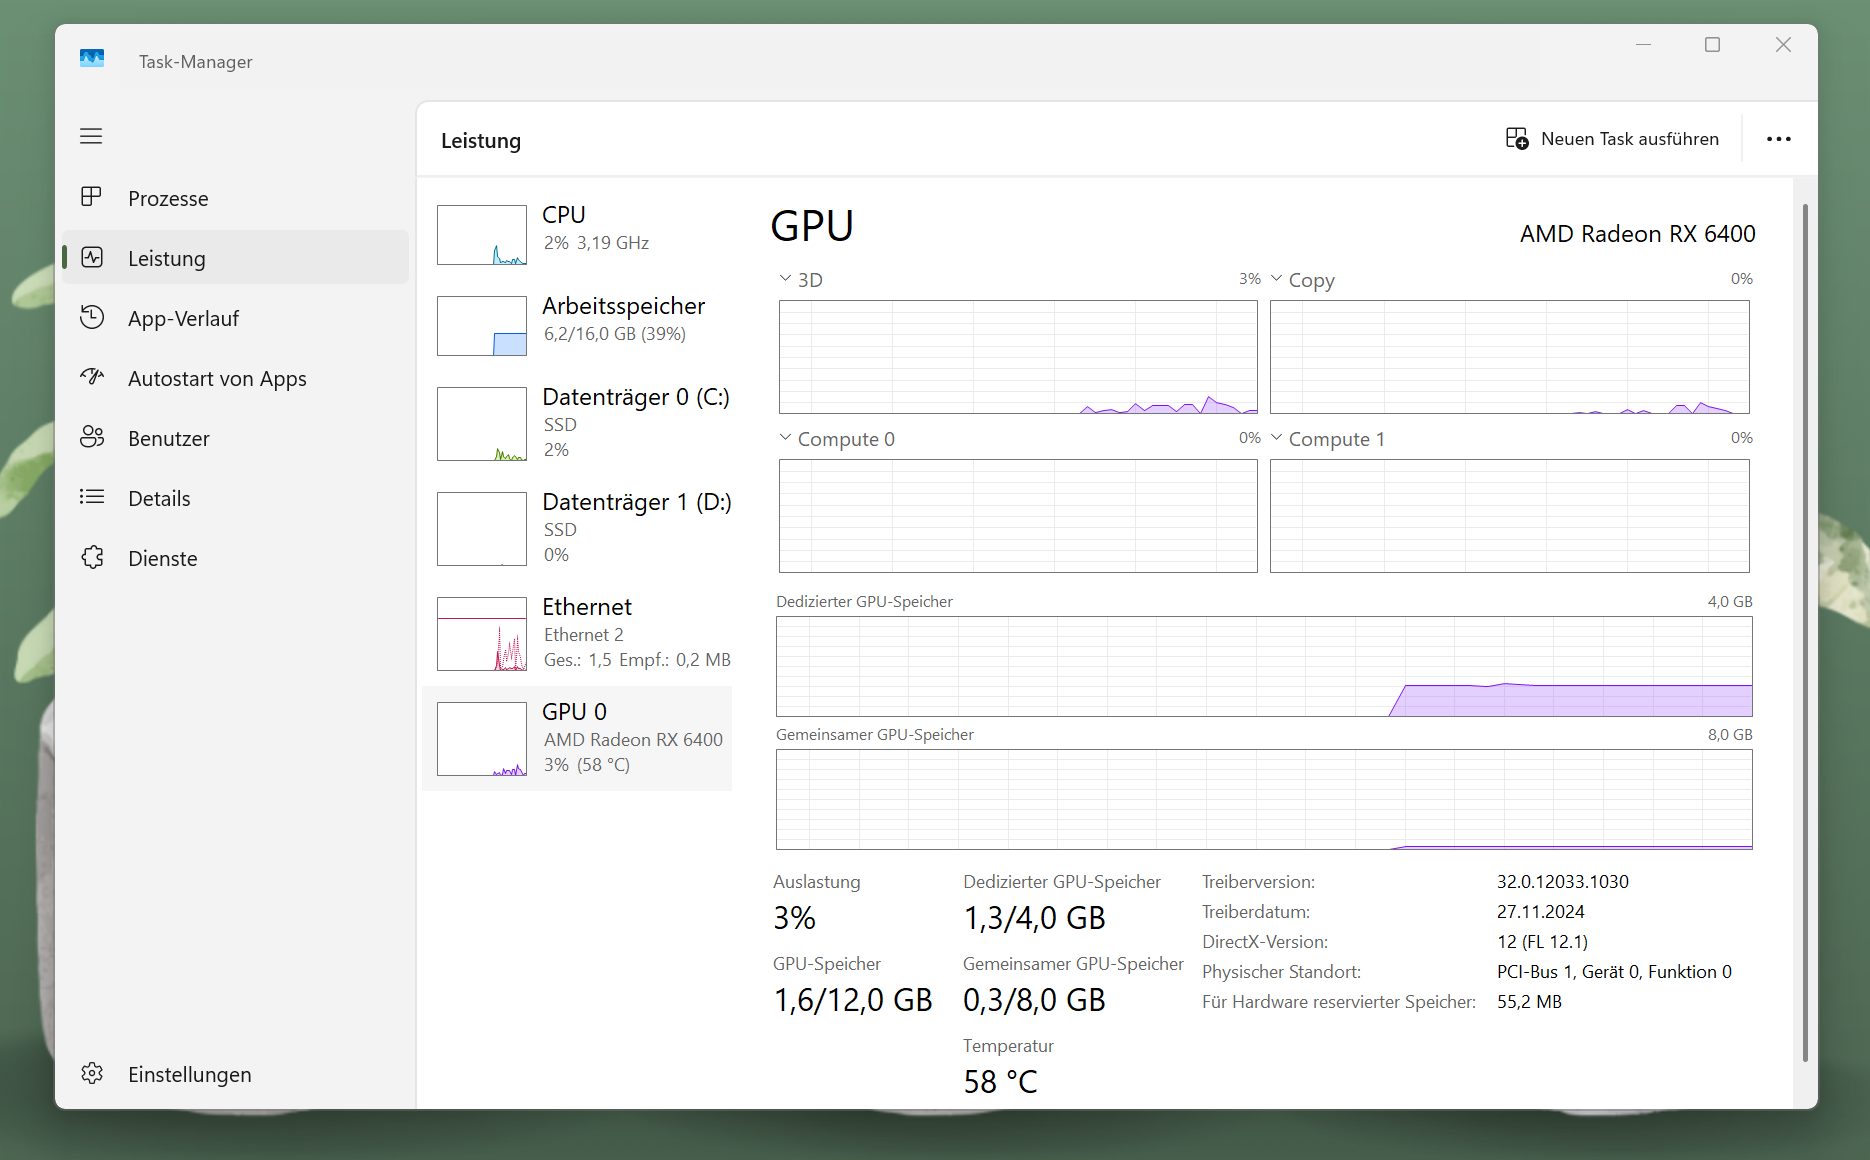
After rebooting the VM, the new configuration must be set. In conclusion, you can download the AMD Driver Software and install it. If everything works correctly, the GPU should be recognized by the installer.


Leave a Reply